Final

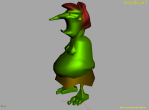
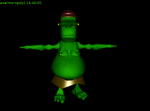
Arms were created. I tried few different textures but none of them were looking good and resembles troll/lizard skin so I decided to take out the textures.

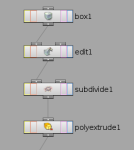
Overall the experience with modeling was a bit stressful in the beginning, which was also due to my schedule and the full time placement I started earlier than expected. But after that is starts to seem like a logical way of modeling with the box modeling technique. I believe it’s a bit more complex for a 3D beginner than it could be,and it might be more intuitive. The other thing I didn’t like much is the scarce resources available on Houdini modeling compared to other software like Cinema 4D and Maya, was also disappointed to find out there are no Lynda.com tutorials as I have myself access to a premium account there. I was concerned in the beginning what the final results will be (hence the worried emails and searching for tutorials) but at the end I tried my best with the time available. I’m satisfied with the result and glad I now have a basic understanding of modelling which I plan to expand in future as the commercial demand for 3d Design/animation and design is rapidly increasing even in spheres like interactive and web design which I have noticed from personal experience.

Head

Then I created the head which was the hardest part to model during the varying shapes of the nose/years and face.

Oh yeah, breasts were added as well and earrings. Colour was added also

Problems with dividing and mirroring an object

Probably one of the biggest problems which I had while modeling was to mirror and connect one half of an object so it connects properly without looking like it’s divided. I was trying to create a different non-symmetric body of the troll similar to the one of this guy.

I created one half of it:

And then the weird problems when connecting it, obviously it wasn’t connected properly and when applying poly-bevel it was looking divided hence the weird shapes.

“It’s a Polysplit geometry I’m trying to mirror – tried with Fuse and Cookie SOP couldn’t manage to connect it properly.
I found solution so far I’m just working on a whole geometry, it’s not symmetrical but at least is something.”


My tutor helped me with a solution to this:

It seems it’s all about refining the polysplit.

At the end of the day I didn’t use that body as it was looking weird and wasn’t coherent with the stomach of the troll.

Start

This is the first part of the troll created using the Box model technique starting from box or circle. I found it quite hard and not very intuitive in the begging but then you start to get the hang of it and it’s becoming even quite exciting. 3DBuzz tutorials and especially this one: How to model a head has proven very useful.

Changing my aim/brief

So, I decided to change completely the way I was going with my character after a few unsuccessful tries. I found it quite hard to create the 3d character without a 3D reference, just referring from the 2D Vector file. Maybe I’ll leave that for my next project when I feel more confident with my skills. Then I was looking for an example 3D character to which I can refer as a help. I decided to go with a character of a troll as I found a lot examples of 3D Trolls which helped me in modeling my character.

Character modelign, first tries

I was watching this video, which seems to be quite old but still helps. Basically it explains the character modeling process based on using extruding, subdivide and edit sops. Designing custom shapes like nose, custom circles, etcs is all manual. What I found is that the whole process is much more difficult and time consuming then what I was expecting. I created the basic shapes (still not as precise and good as I want it to be) and tried to create a chin. The result so far is not satisfying.

Stage 2: Line art

After I decided what I’m going to use as my final sketch, I started with illustrator. Using pen/pencil tool I traced the draft to make it more refined vector sketch which I’ll later use in Houdini to create the 3D piece.

Tutorial: Selections, Modeling

I found a nice collection of Houdini tutorials from 3DBuzz. This one is very basic and covers few things we went through in class about selections of primitives, points, etc – something I’ll need when I’m modeling the geometry objects that construct my character.

This one is quite interesting, they are talking about “box modeling” and creating as further as golem head from a box sop. Sound’s like it will do the work for my little vector.

Stage 1: Sketches

The character has to be: positive, friendly, inviting, calm, inteligent, simple, smart and a bit fun.

My first idea was inspired from a character of American TV series Shameless – aunt Ginger. She is very polite and good with anyone and sometimes knows more things than the others, although she is mentally ill.


However I couldn’t find any good 3D or concept art picture references or something that can help me draw a similar character so I started experimenting, redrawing some other popular 3d characters and slightly changing them.

My final choice was a simple boy/man with exaggerated head size which symbolise the size of his intelligence and a smaller body about the size of his head. His arms and legs are even smaller, almost like a sticky man.

Character Examples

Rango is a chameleon who is trying to adapt to the new social environment he is put in. Smart, isn’t it? His appearance is very different from all other creatures.


The square forms are boring and tired – perfect for the old person. The circle forms represent the positivism and friendly spirit.


Exaggerated and distorted shapes makes this character unique.

Continue reading

Understanding Concept Design

This video from PolyFacecom explores “Character Design for 3D”. It doesn’t cover any technical 3D aspects but speaks about the concept design of a character, the steps and all other additional elements that bring the 3D character to life.

1. Feeling
“It’s all about the feeling you get across. Is your character smart, tall, short, dumb..”
Although I don’t need to go in this deep details of personalization since it’s just a character that will be used in software and not a movie, or as a part of a brand, it’s nice to consider this kind of details.

2. Explore opportunities
“Don’t settle for the first design.”

3. The comfort zone – your worst enemy.

I like this one. This assignment is part of going outside of it, as well.


Another video from the same series which talks about the fundamental decision when creating a concept design of a character like “good or evil?”

Evil Characters – triangular shapes, spikes


Good Characters – rounded shapes and soft curves. Considering I’m creating a positive, inviting and friendly character maybe I should aim at rounded shapes.

It’s interesting to see how he sketches and than goes with one particular sketch and the reasons for the choice: uniqueness, shapes, etc.

How he uses reference images:

Final:

Process Stages

The process of the work will consist in 3 parts:

1. Research.
Explore few other examples and try to understand (at least partially) how character designers bring personality to their 3D Characters.

2. Conceptual design of the character.

Source: Computer Arts 2008

Continue reading

Create a free website or blog at WordPress.com.